Capacitor Barcode Scanner for a Lovable App
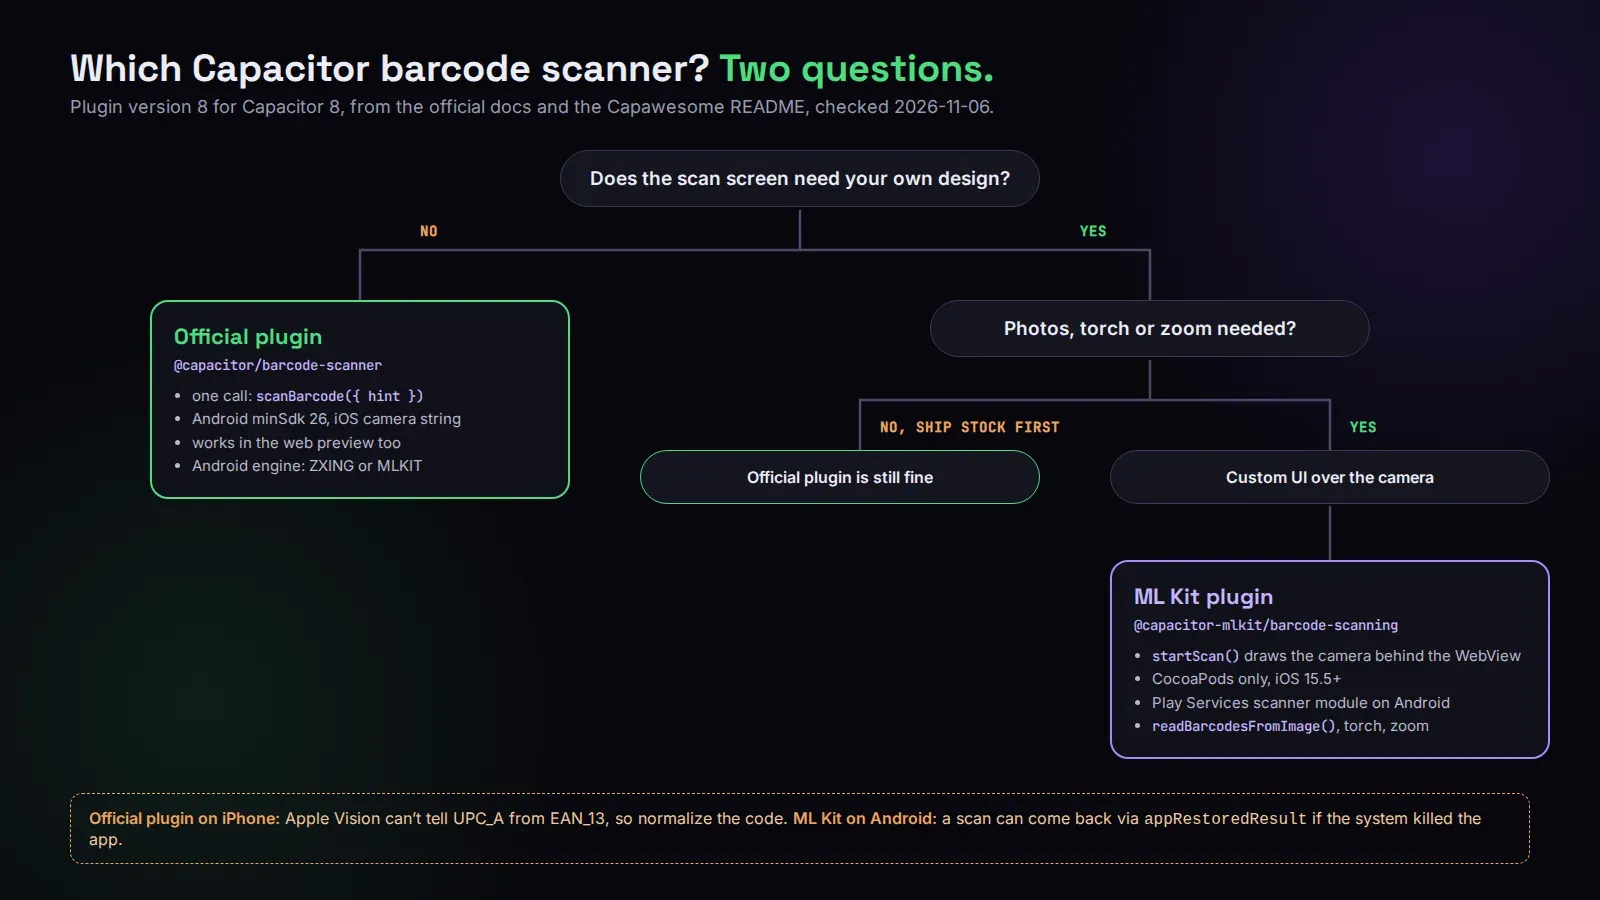
There are two Capacitor barcode scanner plugins worth using in a Lovable app in 2026. @capacitor/barcode-scanner is the official one: one call, scanBarcode(), opens a ready-made scanning screen and hands back the text. @capacitor-mlkit/barcode-scanning from Capawesome puts the camera behind your own web UI, reads barcodes from photos too, and gives you the torch and zoom.
If you just need “scan a QR code, get a string”, take the official plugin and stop reading after the next section. If the scanner is the product (inventory, tickets, a loyalty card wallet), keep going. Everything here comes from the Capacitor barcode scanner docs and the ML Kit plugin’s README, both checked on November 6, 2026, at plugin version 8 for Capacitor 8.
The official plugin in five minutes
npm install @capacitor/barcode-scanner
npx cap sync
Then, wherever your Lovable code has the scan button:
import { CapacitorBarcodeScanner, CapacitorBarcodeScannerTypeHint } from '@capacitor/barcode-scanner';

const { ScanResult, format } = await CapacitorBarcodeScanner.scanBarcode({
  hint: CapacitorBarcodeScannerTypeHint.QR_CODE,
  scanInstructions: 'Point at the code on the ticket',
});
hint is the only required option. Pass ALL (value 17) if you don’t know what users will point it at, but a specific format scans faster and gets fewer false reads off random packaging.
Setup is two lines. On Android, minSdkVersion = 26 in android/variables.gradle. If your project still says 23 or 24 (older Lovable exports often do), the build fails until you raise it. On iOS, add Privacy - Camera Usage Description to Info.plist, and write something specific. “We need your camera” is the kind of string that gets a polite note from App Review.
And yes, it works on the web too, with web.showCameraSelection and web.scannerFPS. That matters for Lovable apps because the same code runs in the browser preview, so you can test the flow before you ever open Xcode.
Things the official plugin won’t tell you up front
Android lets you pick the engine: android.scanningLibrary is ZXING or MLKIT. ZXing reads every format on the list. ML Kit skips MAXICODE, RSS_14, RSS_EXPANDED and UPC_EAN_EXTENSION, and if you ask for one of those it quietly falls back to scanning anything. iOS uses Apple Vision, which also skips MaxiCode and the UPC/EAN extension, and can’t tell UPC_A from EAN_13. For a grocery app in the US that’s a real bug waiting to happen: the same can comes back as a 12-digit code on Android and a 13-digit one with a leading zero on iPhone. Normalize it in your code. Don’t trust the format field to save you.
Then there’s Android 16. With targetSdk 36, scanOrientation is ignored on large screens like tablets. There’s a manifest property to opt out, android.window.PROPERTY_COMPAT_ALLOW_RESTRICTED_RESIZABILITY, and the docs say plainly it’s temporary and won’t work on Android 17. Phones aren’t affected. If your users scan on a tablet mounted at a counter, test it.
When you want ML Kit instead
The Capawesome plugin is the one we reach for when the scan screen has to look like the rest of the app. startScan() renders the camera behind the WebView, so your Lovable UI draws the frame, the buttons, the “3 items scanned” counter, everything. The catch is obvious once you think about it: every opaque element in your app is now covering the camera. Their example adds a barcode-scanner-active class to <body> that hides the page and makes backgrounds transparent, keeping only a .barcode-scanner-modal.
A client of ours spent a full afternoon on a black screen. Permissions were granted, barcodesScanned was even firing, and the logs showed codes coming in. The camera was there the whole time, under a full-height bg-background div that the Lovable layout wraps around every page. One CSS rule fixed it. If you see black, make everything transparent first and debug second.
You also get readBarcodesFromImage() for scanning a photo from the gallery, torch control, zoom, and a ready-made scan() UI on Android and iOS if you want both styles.
Setup is heavier than the official plugin:
- Android needs
android.permission.CAMERAin the manifest plus acom.google.mlkit.vision.DEPENDENCIESmeta-data entry set tobarcode_ui. scan()on Android depends on Google Play Services and the Google Barcode Scanner module. CheckisGoogleBarcodeScannerModuleAvailable()and callinstallGoogleBarcodeScannerModule()on first launch, or Huawei phones and fresh installs fail in ways you won’t see on your Pixel.- iOS needs
platform :ios, '15.5'in the Podfile, and it’s CocoaPods only. The ML Kit SDK doesn’t support Swift Package Manager, so if your Capacitor 8 project went SPM, this plugin pulls you back to Pods.
One nasty edge case on Android: the system can kill your app while the scanner is open, especially on cheap phones low on memory. The scan() promise then never resolves, and the result shows up in the App plugin’s appRestoredResult event instead. If you don’t listen for that, the user scans, lands back in your app, and nothing happens.
Which one I’d ship
For a first release, the official plugin, almost every time. It’s one call, it works in the Lovable preview on the web, and Apple has seen that scanning screen a thousand times. Move to ML Kit when a user complaint tells you the stock screen is the problem, not before.
Whichever you pick, the camera is a native feature, and native features are part of what gets a WebView app through Apple’s guideline 4.2 review. If you’d rather not fight Gradle and Podfiles yourself, we publish Lovable apps to the App Store and Google Play from $300 for up to 5 screens.