Android App Bundle for Your Lovable App
To publish a Lovable app on Google Play you upload an Android App Bundle (an .aab file), not an APK: Google has required bundles for new apps since August 2021. With a Capacitor project you get one with npm run build, npx cap sync android, then either Android Studio’s Build > Generate Signed App Bundle or npx cap build android --androidreleasetype AAB with your keystore details, and since August 31, 2026 that bundle has to target Android 16 (API level 36).
How do I publish my Lovable app on Google Play? The short answer, checked against Google’s Play Console help on October 26, 2026:
- Wrap the Lovable app with Capacitor so there’s an Android project to build (or have us publish it for you).
- Open a Play Console developer account ($25, one time).
- Build a signed
.aabtargeting API level 36, as below, and upload it to a testing track. - If your account is a personal one created after November 13, 2023, run a closed test with at least 12 testers opted in for 14 days in a row before you can apply for production.
- Fill in the store listing, the Data safety form and the content rating, then apply for production access. Google warns that some accounts’ reviews take up to 7 days or longer.
Most first launches spend more time on step 4 than on everything else combined.
The command is the easy part. What trips people up is the keys, so most of this post is about those.
The build, in the order that works
Lovable edits your web code. The Android project in the android/ folder only gets those changes when you copy them in, so every release starts the same way:
npm run build
npx cap sync android
Skip the sync and you ship last week’s app with a new version number. It happens more than you’d think, usually on the release where you were in a hurry.
Then build the bundle. The Capacitor CLI can do it in one line, per the cap build docs:
npx cap build android --androidreleasetype AAB \
  --keystorepath ../keys/upload.jks --keystorepass "$KS_PASS" \
  --keystorealias upload --keystorealiaspass "$KEY_PASS"
Android Studio’s Generate Signed App Bundle wizard does the same thing with a form. If you live in the terminal, ./gradlew bundleRelease inside android/ works too once signing is set up in Gradle, and the file lands in android/app/build/outputs/bundle/release/app-release.aab.
Two things to check before you upload. versionCode in android/app/build.gradle has to go up on every upload, or Play Console stops you with “Version code 1 has already been used. Try another version code.” And targetSdkVersion has to be 36 for anything submitted after August 31, 2026 (Google’s target API page). Capacitor 7 projects target 35, so that means the Capacitor 8 upgrade first.
Two keys, and only one of them is yours
This is the part worth slowing down for.
When you sign the bundle on your machine, you sign it with your upload key. That key’s only job is proving to Google that the upload came from you. Google then strips that signature and signs the APKs it builds for each phone with the app signing key, which Google generates and keeps for you under Play App Signing. New apps are enrolled automatically. Users never see your upload key at all.
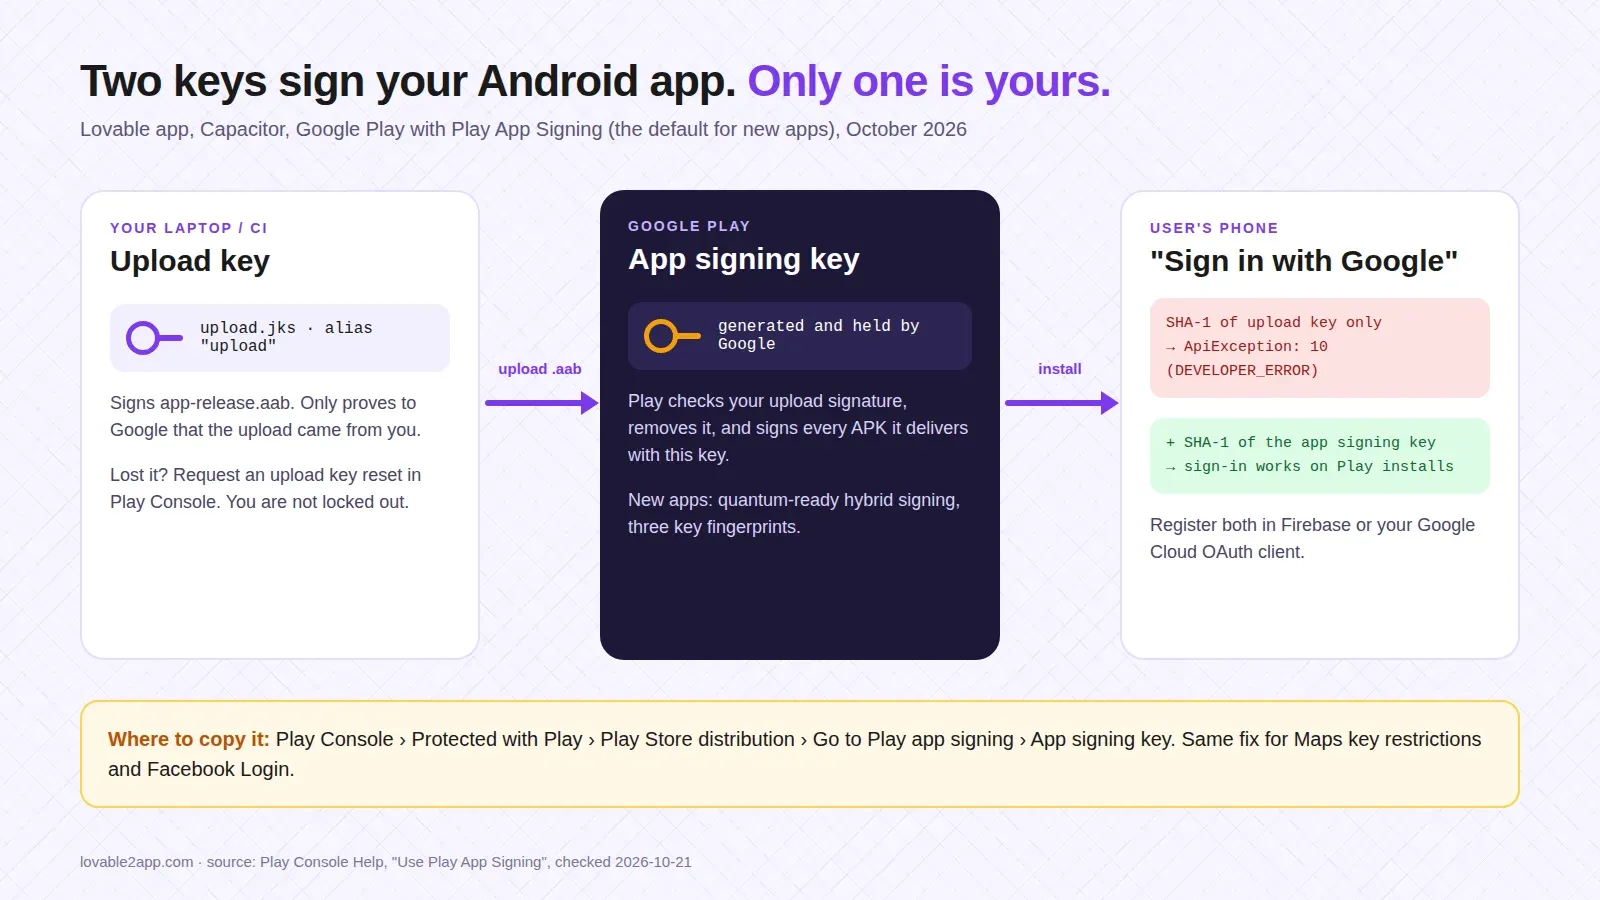
That split is good news and bad news.
The good news: if you lose the upload key, you’re not locked out. Make a new one, export its certificate with keytool -export -rfc to a .pem file, then in Play Console go to Protected with Play > Play Store protection > Manage Play app signing and click Request upload key reset (Play App Signing help). Before Play App Signing, a lost key meant a new app listing and starting over at zero reviews. Back up the .jks file and its passwords anyway. A password manager entry with both passwords and the alias saves a very annoying afternoon.
The bad news is the one that bites Lovable apps specifically.
Why Google sign-in works in testing and fails from Play
Your Lovable app probably has “Sign in with Google” through Supabase. In the native app that often means a Google Sign-In plugin, and Google only accepts sign-ins from an Android app whose certificate fingerprint (SHA-1) is registered in your Google Cloud OAuth client or Firebase project.
So you register the SHA-1 from your keystore, test a release build on your phone, everything works. You publish. Users install from Play and sign-in fails with ApiException: 10 (Google calls it DEVELOPER_ERROR). The app on their phone is signed with Google’s app signing key, not yours, and that fingerprint was never registered.
The fix takes two minutes once you know it. In Play Console, open Protected with Play > Play Store distribution > Go to Play app signing, copy the SHA-1 of the app signing key (not the upload key; new apps on Google’s quantum-ready hybrid signing show three keys, and you need all three fingerprints), and add it next to the existing one in Firebase or as another Android OAuth client in Google Cloud. Keep the upload key’s fingerprint there too, so your own sideloaded test builds keep working. Google’s help page says it in one line: register the Google-held key’s fingerprint with your API providers, “not just your local upload key”. Same goes for Facebook login, Maps API key restrictions and anything else that pins your app’s certificate.
Getting it in front of people
Upload the first bundle to the internal testing track. It has no requirements, Play says builds usually reach testers within seconds, and it’s the fastest way to find out whether the release build behaves like the debug one. If your developer account is a personal one created after November 13, 2023, you then need a closed test with 12 testers opted in for 14 days in a row before production unlocks. Our Google Play guide covers that rule and the rejections we see most.
A last opinion: don’t put keystore passwords in capacitor.config.ts or commit them to the repo Lovable syncs with. That repo is the one you give contractors access to. Environment variables in your build machine or CI, nowhere else.
If you’d rather hand over the whole Android release, keys, fingerprints, bundle and store listing, that’s what we do, at a fixed price.